Thursday, August 30, 2012

How Carburetors Work Part 1

I love carburetors. I love their looks, their mechanisms, and I love them even when they don't want to start up on a cold day or won't run quite right when the temperature dips. It's this organic quality of carburetors that turn a machine into something with a personality; a tempermental bison maybe... People ride bisons right?

AAAAaaawwwwwww yeeaaaah!


Over the next few weeks I'm going to derive (build up) a carburetor from extremely simple beginnings. Hopefully this will not only show how various pieces work, but why they are neccessary in the first place.

Let's start with why carburetors (or indeed fuel injectors) are neccesary at all. Fuel itself is not extremely volatile and won't explode the way your engine needs it to without a good amount of air mixed into it. So the whole point of the carburetor, is to mix air and fuel in such a way that your motor can burn it up easily.

During the intake stroke of an engine, the downward motion of the piston creates a vacuum in the combustion chamber which in turn sucks air into the combustion chamber through the motor's intake port.

The downard motion of the piston creates a vacuum in the combustion chamber


Of course your carburetors are mounted at the mouth of the intake port and therefore, air gets sucked through your carburetors as well.

As air moves through your carburetors, it passes the Venturi, a point where the diameter of the carburetor is reduced. When a volume of air moves through a restricted space, it naturally speeds up. This is called the Venturi Effect. Consequently, an increase in the speed of air results in a decrease its pressure. This is called the Bernoulli Principle. I'm not making this stuff up, I promise. Google it!

Slow moving air on the right is turned into fast moving air on the left by the venturi


Now lets put a bowl of fuel under the venturi and lets say this bowl has atmospheric pressure (which would be higher pressure than the air passing through the venturi).

Imagine low pressure air in the carb throat and high pressure air in the fuel bowl


If we were to connect the fuel bowl to the venturi, nature will attempt to balance out the negative air pressure in the venturi by sucking up air and fuel from the atmospherically pressurized fuel bowl. The fuel sprays out of the fuel bowl as a fine vapor and is carried into the engine by the air moving through the carburetor. The process creating this fuel vapor is called Atomization.

Fuel is sucked into the venturi as nature attempts to balance the low pressure air in the venturi with the atmospheric pressure air in the fuel bowl


Proper atomization, that is, a proper mixture ratio of fuel to air, is the ultimate goal of tuning carburetors (a topic that will be covered later, maybe). To limit the amount of fuel that is atomized, the main passage that leads to the venturi (also called a Main Circuit) can be restricted with a Main Jet. A larger main jet opening will result in a Rich mixture of fuel and air, while a smaller main jet opening will will Lean out the mixture of fuel and air.

Main fuel circuit restricted with a mainjet


While a carburetor like this might work in theory it isn't really practical. We can make it much more useful with the addition of a Throttle Plate A.K.A Butterfly Valve. The throttle plate rotates about a pivot located inside the carburetor allowing a rider or driver to modulate the amount of air that is pulled through the carburetors.

A fully open throttle plate allows the maximum amount of air and fuel to flow into the engine, almost as if the throttle plate wasn't there at all (almost).

A fully open throttle valve will allow maxium air and fuel flow into the engine


A fully closed throttle plate on the other hand will (almost) completely cut off the vacuum created by the cylinders, preventing air from being drawn into the carburetor at all. Consequently, because no air is moving through the venturi so no fuel gets atomized :(

A closed throttle blocks air from passing over the main fuel circuit


So this presents us with a problem. When we let go of the throttle, we don't want air and fuel to be cut form the engine completely because the engine will die! One solution to this problem is to introduce an Idle Circuit.

The idle circuit operates on the same principle as the main circuit. However, since the opening is located 'behind' the throttle plate the vacuum created by the engine will suck enough fuel and air to prevent the engine from dying even when the throttle plate is closed :)

The idle circuit allows fuel to be fed into the engine even with the throttle plate closed


Like the main circuit, the atomization of fuel through the idle circuit can also be tuned with an Idle Jet A.K.A. Pilot Jet. A larger idle jet will richen the mixture of air and fuel, and a smaller idle jet will lean out the mixture of air and fuel.

Like the main circuit, the idle circuit can also be tuned with a restrictor


With the throttle open, both the main and idle circuits work to feed fuel into the engine.

With the throttle open, both the main and idle circuits work to feed fuel into the engine


Hopefully no one's head has exploded yet. Stay tuned for part 2.

Thursday, August 23, 2012

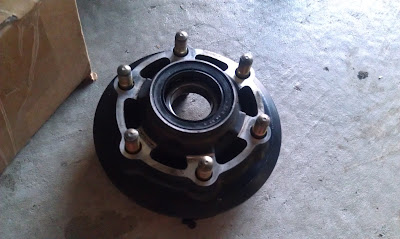
OZ Rims!

While my bodywork was being repaired towards the end of July, I came across a smokin' deal on Kijiji for a set of OZ forged aluminum rims.

Now, anyone whos owned a ZX7 will tell you that the wheels are heavy enough to hold down battlecruisers so a set of nice light-weight wheels are just the ticket for making the bike a little more nimble.

Wheels came with Michelin Power Pure 2CT tires ...

... Braking rotors front and back ...

... and two Sunstar sprockets (I think they're Sunstar, maybe JT)


Upon picking up the wheels I notice that while the front wheel is noticably lighter than the stock ZX7 item, the rear wheel still feels quite heavy. Maybe my arms just arn't sensitive enough to the weight difference. Anyways I'll know for sure when I take my wheels off for the swap.

Before I can even put the wheels on, I have to make some wheel spacers. You see, these wheels were originally intended for use on a 3rd Generation ZX10.

The front wheel is relatively easy to fit since the ZX10 and ZX7 have the same caliper spacing and same axle diameter. If it wasn't for the analog speed sensor on the left of the front wheel, the ZX10 wheel would bolt right in.

Mock fitting the front wheel.

Wheels need to be... greener

The rear wheel is a little more difficult. For starters, the ZX7 uses a 25mm axle while the ZX10 uses a 20mm axle. Additionly the sprocket-disc distance for the ZX10 and ZX7 are different which means if one lines up the other doesn't. I'll leave the rear wheel for last.

Time to start making some wheel spacers for the front!

Turning out the inner diameter

Turning out the outter diameter

Several hours later, we have a wheel spacer! :)

Perfect fit!

Here's a comparison of  my spacer to the original


Prior to this, I've never worked with a lathe before (or any machining equipment for that matter) so the finish is a little rougher than I'd like. More passes in smaller increments is, as I have found out, the key to a nice finish. Another thing I learned is that working on a small lathe is a PAIN IN THE ASS. What takes larger lathes a few mins to do on youtube, takes me a whole freaking day! Suddenly I have a new found appreciation for hand crafted components like those found on GP bikes.

Tuesday, August 21, 2012

I Hate Tipping

So I rode my bike for a few hundred kms after installing the chain and it felt great. First gear didn't require nearly as much clutch slipping to get moving which was the main obstacle to a streetable ride.

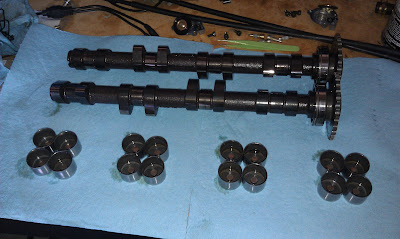
In addition to the gearing I changed my fork oil which probably hasn't been touched since 1996 and reshimmed my valves.

Old fork oil

New fork oil... or what fork oil SHOULD look like

Shimming valves probably has the highest ratio of "looks difficult":"simple as dirt" out of all the regular maintenance jobs on a bike

Cams n' buckets


After all that work, I couldn't be happier with the way the bike rode. Then I come out of the office the next day to find by bike lying on the ground! I immediately ran outside to pick it up so I don't have any pictures of it lying on its side but you can see the extent of the damage.

Shiiiiiii ...

... iiiiiiiiiiii ...

... iiiiiiiiiiii ...

... iiiiiiiiiiiiiii ...

... iiiiiii ...

... iiiiiiit!!!!!!


In case you can't tell from the pictures the bike's kickstand sunk into the asphalt far enough for the bike to plummet to its side. Now fast forward a few weeks and...

We're green again!!!!


In addition to paint, I also splurged on a set of new OEM ZX9 mirrors which I think look pretty cool. The black rims are off my ZX7P8. I'll eventually get something green.

Old paint

Monday, August 20, 2012

520 Chain Conversion

So where have I been and what have I been up to for the last month or so? Well, I've fiddled with the final drive, freshened up the valve train, reworked some suspension, and sprayed some paint.

Lets start with the '520 conversion' I installed. Back in Feburary I bought a set of aluminum 520 sprockets made by Renthal. I can't remember why I needed them but since the 7RR has a pretty tall first gear I figured new gearing (15/45 as opposed to the stock gearing of 16/42) could help.

Big box of stuff - bought in Feburary, opened in July.

Lets see what we've got here. A 45 tooth Renthal 'ultralite' rear sprocket ...

... a 15 tooth Renthal 'ultralite' front sprocket (which was apprently made for either a Suzuki or Triumph) ...

... and a new chain!

Off with the rear wheel

Off with the sprocket carrier


On with the new Renthal

And thats the rear wheel done!

Now for the front sprocket. How many Asian bike enthusiasts does it take to swap a front sprocket? ...

... apparently two, as long as one of them is armed with an impact wrench


I should mention that the front sprocket was a massive pain to get off. Partly due to the corrosion and partly due to the nature of front sprockets. I tried everything myself; heat, breaker bars, impact wrench etc. In the end the impact wrench is what ultimately did the job but only while I got R1 Buddy to sit on the bike with the old chain hooked up. In hind sight, I should have loosened the front sprocket before removing the rear wheel! That's a tip kids, write it down.

I doubt this area has been cleaned since the bike rolled off the floor in 1996

Be careful of the rubber dust seal when cleaning this area. Solvent and rubber don't play nice

New sprocket

New washer and nut. That's it for the front!

Now for the chain. I love how these things come packaged like meat.

Cutting the chain down to size. Few things short of wresting with a T-Rex is manlier than cutting metal... even if it's with a dremel

Almost there. Clip on the master link ...

... and we're done! Yay!

Remember to torque the front nut before going on a joy ride. Like removing the nut, its best to have someone sit on the bike so you can torque it properly... and don't forget to bend a lip of the washer over the nut.